How to Print Under Linux?
Table of Contents
- Prefix
- Quick Installation
- The Concept of Linux Printing
- The Printing Flow Sheet
- Configuration Instruction
- Annotations
- References
Prefix
This is a Printing-HOWTO
written by me. It was originally a short note, to remind myself of the complicated configuration of printing. Then it became longer and longer, until it finally came to this Linux Printing HOWTO
.
This article introduces the samba - LPRng - ifhp filter - ghostscript uniprint driver
printing model. If you are using other printing packages, the setting procedure may be different.
I am the only author of this article. It was not authorized by, nor disscussed with any of these package authors. It is not an official documentation of any package. If you find any bias, error or deficiency, please mail to me. Thanks.
Quick Installation:
If you share this printer only for your windows workstations, or if you are setting a print server for a windows-only network, that you does not really need linux printing, just follow these steps. If you are really setting a linux printing
, wanting to print under linux, or if you want to know more about linux printing model, bypass these part.
-
Connect Your Printer:
Connect your printer to LPT1 and do the following test:
% echo "Hello, world!" >> /dev/lp0
Your printer should start working. Eject the paper and see if
Hello, world!
is properly printed. If it is, proceed to the next step. [1] -
Configure LPRng:
- Download the newest LPRng: http://www.lprng.com/.
- Uncompress, compile and install LPRng:
% tar xzf LPRng-x.x.x.tgz
% cd LPRng-3.x.x
% ./configure --prefix=/usr --sysconfdir=/etc --mandir=/usr/share/man --disable-setuid
% make
% make test
% su
$ make install
- Set your /etc/printcap as follows:
# simpliest printcap file for samba client only
lp:
	:lp=/dev/lp0
	:sd=/var/spool/lpd/%P
- Test:
Your printer should start working. Eject the paper and see if$ checkpc -f $ echo "Hello, world!" | lpr
Hello, world!
is properly print. If it is, go to next step. [24]
-
Configure samba:
- Download and install samba from http://www.samba.org/samba/samba.html. This is out of the scope of this article. Please refer to the samba documentation.
- Configure the printer share: set the [printers] section in your /etc/smb.conf (or /usr/local/samba/lib/smb.conf) as follows:
Remember to create the directory /var/spool/lpd/samba, with its owner as root and its permission as 1777.[printers] comment = Printers printable = yes browsable = no public = no valid users = @users printing = lprng path = /var/spool/lpd/samba print command = /usr/bin/lpr -P%p -r %s lpq command = /usr/bin/lpq -P%p lprm command = /usr/bin/lprm -P%p %j lppause command = /usr/sbin/lpc hold %p %j lpresume command = /usr/sbin/lpc release %p %j queuepause command = /usr/sbin/lpc -P%p stop queueresume command = /usr/sbin/lpc -P%p start
- Test: check your smb.conf with testparm,
If everything is fine, restart your samba. Now you should go back to your windows workstation and reload your network neighborhood. Can you see the printer now? [26]$ /usr/local/samba/bin/testparm
-
Install the Remote Printer on Your Windows Workstation:
Please refer the windows help and your printer manual for setting your remote printer on your windows workstation. Remember to print a test page to see if everything is OK. [27]
The Concept of Linux Printing
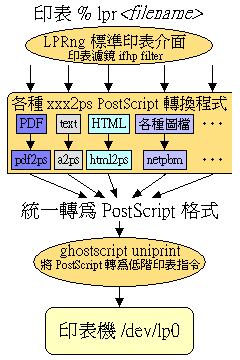
The basic steps of linux printing are stated below:
- Convert all types of target files into a unified PostScript printing format, using their specified xxx2ps PostScript converter according to their original file type.
- Send the PostScript output to Ghostscript, the PostScript printer emulator. Ghostscript then converts the received output to the low-level printer language according to the specified printer driver. The final output is then sent to the printer on printer port.
The Printing Flow Sheet
The dash lines are the path of the Windows/samba printing.
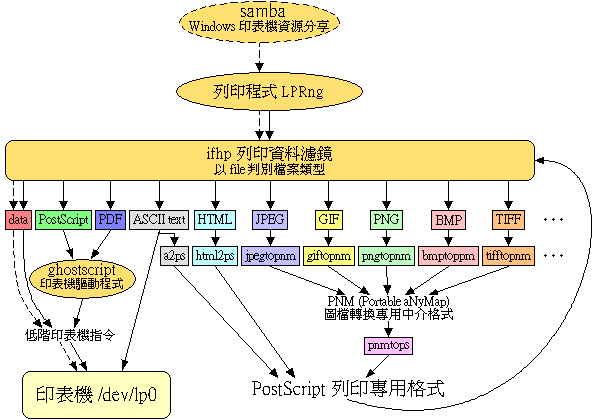
- The target data is received by samba printer share. (You may pass this step.)
- The target data is print with lpr printing command by LPRng. The main configuration file is /etc/printcap.
- The target data is then sent to a print filter, such as ifhp. The print filter then call the file command to check the data format and process the data according the result format. The configuration file here is /etc/ifhp.conf.
- If the format is not raw data or plain text, the data is then converted to PostScript format using the proper PostScript converter according to its original data format.
- Convert the PostScript format data to low-level printer language using Ghostscript PostScript printer emulator (with uniprint), and sent to the printer on the printer port.
Configuration Instruction
We go bottom-up, step by step:
-
Connect Your Printer:
Connect your printer to LPT1 and do the following test:
% echo "Hello, world!" >> /dev/lp0
Your printer should start working. Eject the paper and see if
Hello, world!
is properly printed. If it is, proceed to the next step. [1] -
Configure Ghostscript, the PostScript Emulator (with uniprint):
After you have properly connected your printer and been able to print simple English text directly, we want to print some PostScript documents. If you have a PostScript printer, (which, the, means that you are very rich, or your printer might be owned by the company or the school,) and you can print PostScript documents directly, you can bypass here and proceed to the next step.
PostScript is the standard printing document format set up by Adobe, inc. at 1985. It is supported by most laser printers. But I guess yours is a cheap and poor inkjet or dot-matrix printer, so we move on.
Ghostscript is a PostScript emulator. With software emulation, it turns a non-PostScript printer to a PostScript printer and print the PostScript format documents. By doing this way, our cheap and poor inkjet printer can then be treated as a deluxe PostScript laser printer. [3]
Ghostscript translates PostScript language into all kinds of low-level printer language. The translated result is then sent to the printer. Ghostscripts needs to know all kinds of low-level printer languages, which are the so-called
printer drivers
. Ghostscript is released with a bunch of printer drivers. But if your printer driver is not inside, you could look for it in the LinuxPrinting printer database and see if someone had written a Ghostscript driver for your printer before. You can then download and ultilize it. You’ll have to recompile Ghostscript unless it is a uniprint driver.Uniprint (Unified Printer Drivers) is a Ghostscript printer driver specification that was originally designed for the Epson Stylus Color printers. It can be downloaded and used directly without recompiling Ghostscript itself. Uniprint drivers have an .upp file name suffix. [4]
- You’ll have to install zlib, libpng and jpeg first. They are out of the scope of this article. Please refer to their individual installation instruction.
- Download the newest Ghostscript: [5]
- AFPL Ghostscript: http://www.ghostscript.com/.
- GNU Ghostscript: http://www.cs.wisc.edu/~ghost/.
- Uncompress, compile and install Ghostscript:
Edit the Makefile and modify the installation prefix:% tar xzf gnu-gs-6.52.tar.gz or ghostscript-x.xx.tar.gz % cd gsx.xx % ln -s src/unix-gcc.mak Makefile
Runprefix = /usr
make
now:
Then, go to /usr/share/ghostscript/ and uncompress the Ghostscript fonts:% make % make test % su $ make install
$ cd /usr/share/ghostscript/
$ tar xzf ghostscript-fonts-std-x.x.tar.gz
$ tar xzf ghostscript-fonts-other-x.x.tar.gz
- Configure your printer type and driver. Check the Ghostscript printer detail for your pinter model name or your uniprint driver name. If you do not find your printer there, you could try to search it in the LinuxPrinting printer database. You’ll need to recompile Ghostscript if your downloaded driver is not a uniprint driver. If it is, you just save it in /usr/share/usr/share/ghostscript/x.xx/, together with other .upp uniprint drivers. That’s all.
- Test: There’re some example PostScript files in /usr/share/ghostscript/x.xx/examples/. We will try to print them out. For a non-uniprint printer driver:
where xxxxxxxx is your printer model. For unprint,$ cd /usr/share/ghostscript/x.xx/examples/ $ gs -sDEVICE=xxxxxxxx -sOutputFile=/dev/lp0 tiger.ps
where xxxxxxxx.upp is the file name of your uniprint driver. If Ghostscript could read your printer driver, it shall print a giant tiger now. [7] You could put this line as an alias in your ~/.bashrc:$ cd /usr/share/ghostscript/x.xx/examples/ $ gs @xxxxxxxx.upp -sOutputFile=/dev/lp0 tiger.ps
alias gs="gs -sDEVICE=xxxxxxxx -sOutputFile=/dev/lp0"
-
Configure All Kinds of xxx2ps PostScript Converters:
Now you can print the PostScript documents. If you have a non-PostScript document, you can convert it into PostScript format and print it. There are plenty of PostScript converters for all the existing different file formats. Their installation procedures are rather simple, so I’ll omit them here. Some of the common PostScript converters are listed below:
- ASCII text: a2ps http://www-inf.enst.fr/~demaille/a2ps/. [8]
- HTML documents: html2ps http://www.tdb.uu.se/~jan/html2ps.html.
- PDF documents: pdf2ps in the Ghostscript package. [9]
- Graphics: netpbm http://netpbm.sourceforge.net/. [10][11]
Don’t forget to test if you can print the converted PostScript results after you install these converters.
$ echo "Hello, world" | a2ps -o - | gs -
$ html2ps < /usr/local/apache/htdocs/index.html | gs -
$ gs mypdf.pdf
$ giftopnm < mygif.gif | pnmtops | gs -
$ jpegtopnm < myjpeg.jpg | pnmtops | gs -
$ pngtopnm < mypng.png | pnmtops | gs -
$ bmptoppm < mybmp.bmp | pnmtops | gs -
$ tifftopnm < mytiff.tif | pnmtops | gs -
$ ...
From this point on, you could print any file, as long as you can convert it into PostScript format with a proper PostScript converter. We can finally print files now.
-
Configure ifhp, the Print Filter:
The ability to print files is not enough. For every file we print, we need a different converter. We convert this file here, and convert that file there, here and there, here and there… It’s so troublesome! We need an intelligent agent to automatically check the file type and call the necessary converter. This, is the so-called
print filter
. The basic of the print filter is very simple. You can try to write one, too, after reading the following illustrations.There are many existing filters. Some of the common ones are: lpdomatic (LPD-O-Matic) [12], tops, magicfilter [13], apsfilter [14] and rhs-printfilters [15]. ifhp is the print filter I’m using, and it is written by the LPRng team themselves, so I use it in the following illustration.
- Download the newest ifhp: http://www.lprng.com/.
- Uncompress, compile and install ifhp:
% tar xzf ifhp-x.x.x.tgz
% cd ifhp-x.x.x
% ./configure --prefix=/usr --sysconfdir=/etc --mandir=/usr/share/man
% make
% make test
% su
$ make install
- Set your /etc/ifhp.conf as follows:
- Set your printer’s section: Look for your printer’s section [ xxxxxxxx ] inside the /etc/ifhp.conf, where xxxxxxxx is your Ghostscript driver name. If you are using a downloaded driver, you might need to insert a new section by yourself. Take uniprint driver as an example:
where xxxxxxxx.upp is the file name of your downloaded uniprint driver. By configuring this way, ifhp can locate your printer settings by the printer name.[ xxxxxxxx.upp ] status pjl@ pcl@ ps@ text gs_converter= \%s{gs_unidriver} gs_device=xxxxxxxx.upp - Set the file type maping: Insert the following file_output_match settings in the end of your printer section. If these settings already exist, you might have to overwrite them.
where \%s{string} will be replace with the previous string= settings. When it comes to print, ifhp will call /usr/bin/file to check the file type. The returned result string will be compared with these patterns, and execute the command at the right side for the matching pattern at the left side. If there’s no more command at the right side for that matching left-side pattern, the data will be treated as the final converted result and sent to the printer directly. For example,file_output_match = [ *postscript* raw \%s{gs_converter} *text* text [16] *01-* text *pcl* filter \%s{pcl_converter} *pjl* filter \%s{pjl_converter} *html* filter \%s{html_converter} *pdf* raw \%s{pdf_converter} *37)* raw \%s{pdf_converter} *jpeg* filter \%s{jpeg_converter} *gif* filter \%s{gif_converter} *png* filter \%s{png_converter} *pc_bitmap* filter \%s{bmp_converter} *tiff* filter \%s{tiff_converter} *gzip_compressed* filter \%s{gzip_decompress} *data* raw ]% file myphoto.jpg myphoto.jpg: JPEG image data, JFIF standard
JPEG image data, JFIF standard
matches*jpeg*
(case insensitive), so ifhp will call jpeg_converter. You could design your own pattern according to the result string returned by the file command. - Set the converts (xxx_conveter): Look for the line containing a2ps_converter=. Add the following lines below:
ifhp will execute these commands with I/O pipping: send the source data to their stdin, and obtain their converted result from their stdout.html_converter= /usr/bin/html2ps 2>/dev/null pdf_converter= \%s{gs_converter} jpeg_converter= /usr/bin/jpegtopnm | /usr/bin/pnmtops -noturn[18] gif_converter= /usr/bin/giftopnm | /usr/bin/pnmtops -noturn[19] png_converter= /usr/bin/pngtopnm | /usr/bin/pnmtops -noturn bmp_converter= /usr/bin/bmptoppm | /usr/bin/pnmtops -noturn tiff_converter= /usr/bin/tifftopnm | /usr/bin/pnmtops -noturn
- Set your printer’s section: Look for your printer’s section [ xxxxxxxx ] inside the /etc/ifhp.conf, where xxxxxxxx is your Ghostscript driver name. If you are using a downloaded driver, you might need to insert a new section by yourself. Take uniprint driver as an example:
- Test: Try to print /tmp/myfile:
If it is properly printed, your ifhp is ready. [20] We have come to an end at this point. Now we have an intelligent printing program that can print all kinds of files now. You can put the above line in your ~/.bashrc as an alias:$ /usr/libexec/filters/ifhp -Tdev=/dev/lp0,model=xxxxxxxx < /tmp/myfile
You can have yourself a cup of coffee and take a rest now. ^_*'alias ifhp="/usr/libexec/filters/ifhp -Tdev=/dev/lp0,model=xxxxxxxx"
-
Configure LPRng:
We finally have ifhp, an intelligent print filter that can automatically assign the data conversion by file type, and send the finally output to the printer. With this ifhp we could print almost anything. Is that all?
Not yet. What we need is far more complicated than a simple
printing
. We need a set ofprinter management
: Queue the files in a line when several files are printed at the same time, put the important files first in the line, or stop printing when the paper is jamed. Besides, the permission of /dev/lp0 is 0660. It’s not a good idea to grant everyone the privilege to write to /dev/lp0 directly. [21]That’s why we need LPRng, the printer manager, to manage all the print jobs.
- Download the newest LPRng: http://www.lprng.com/.
- Uncompress, compile and install LPRng:
% tar xzf LPRng-x.x.x.tgz
% cd LPRng-x.x.x
% ./configure --prefix=/usr --sysconfdir=/etc --mandir=/usr/share/man --disable-setuid [22]
% make
% make test
% su
$ make install
- Set your /etc/printcap: [23] If you use ifhp with Ghostscript uniprint driver, exactly the same as what I told you above, (well, nice girl. ^^;) set your /etc/printcap as follows:
%P will be replaced with the printer name, which is the lp: here on the first line. You could change it to a more meaningful name, like hpdj670c or so. The value of :sd= is the print queue directory. Be sure to create this directory if it does not exist. It should be owned by root with permission 1777, like the /tmp directory.# printcap file for ifhp filter with Ghostprint uniprint driver lp: :lp=/dev/lp0 :sd=/var/spool/lpd/%P :ifhp=model=xxxxxxxx :filter=/usr/libexec/filters/ifhp
- Set your /etc/lpd.perm: /etc/lpd.perm is the configuration file of the printer privileges. lpd is running as root or daemon. We need first restrict the client domain or IP to avoid the security problem. Add the follow lines in the front of /etc/lpd.perm:
If this printer is provided to a limited number of people, we can loosen the privilege to ease the management. Comment out the line# Reject outsiders by IP. The format is IP or IP/submask REJECT SERVICE=X NOT REMOTEIP=127.0.0.1,192.168.0.0/255.255.0.0 # Reject outsiders by domain. REJECT REMOTEHOST=X NOT REMOTEIP=localhost,*.your.domain
ACCEPT SERVICE=C LPC=lpd,status,printcap
, and replace with the following one:
Also, you need to allow the administrator the priviledge to remove the broken print jobs. Locate the line# Loosen the priviledge. Let users pause/resume their print job. #ACCEPT SERVICE=C LPC=lpd,status,printcap ACCEPT SERVICE=C LPC=lpd,status,printcap,hold,release,stop,start REMOTEGROUP=users
ACCEPT SERVICE=M SERVER REMOTEUSER=root
:# allow root on server to remove a job ACCEPT SERVICE=M SERVER REMOTEUSER=root ACCEPT SERVICE=M SERVER REMOTEGROUP=lp
- Test: Check the settings in /etc/printcap first:
checkpc -f will check the settings in /etc/printcap for problems, such as non-existing :sd= directory, and correct them at its best. Then, ask lpd to reread the /etc/printcap.$ checkpc -f
Now print the /tmp/myfile again:$ lpc reread
If it is properly printed, congratulations! Everything is ready now. ^_*' [24]% lpr /tmp/myfile
Refer to LPRng-HOWTO for more infomation on how to manage the print jobs with lpr, lprm, lpc, lpq… etc.
-
Configure samba: [25]
You can bypass the following if you are not going to share this printer for your windows workstations.
- Download and install samba: http://www.samba.org/samba/samba.html. (This is out of the scope of this article. Please refer to the samba documentations.)
- Set the printer shares: Set the [printers] section in your /etc/smb/conf (or /usr/local/samba/lib/smb.conf) as follows:
Don’t forget to create the directory /var/spool/lpd/samba. It should be owned by root, with privilege 1777.[printers] comment = Printers printable = yes browsable = no public = no valid users = @users printing = lprng path = /var/spool/lpd/samba print command = /usr/bin/lpr -P%p -r %s lpq command = /usr/bin/lpq -P%p lprm command = /usr/bin/lprm -P%p %j lppause command = /usr/sbin/lpc hold %p %j lpresume command = /usr/sbin/lpc release %p %j queuepause command = /usr/sbin/lpc -P%p stop queueresume command = /usr/sbin/lpc -P%p start
- Test: Test your smb.conf with testparm,
If everything is fine, restart your samba. Now you should go back to your windows workstation and refresh your network neighborhood. Can you see this printer now? [26]% /usr/local/samba/bin/testparm
-
Install the Remote Printer on Your Windows Workstation:
Refer to the windows help and your printer’s installation guide. Don’t forget to print a test page and see if it works. [27]
Annotations:
- If you can’t even get the
Hellp, world
, check the following by order:- Is your printer broken? Is your power cord plugged in? Is your power switch on? Is your printer power light shining? Is your printer warning light flashing? Is your cartridge / toner run out? Is your paper run out? Is there a paper jam?
- Is your printer on LPT1? Is the connector properly connected? Is there a bad connection? If your printer is on LPT2, use /dev/lp1 instead; if it is on LPT3, use /dev/lp2, and so on.
- If you don’t be sure whether your printer printer is broken, connected it to a windows workstation and see if it works. If this still won’t help, contact the custom service line of your printer manufacturer.
- As the time goes by, PostScript has become the standard printing document format for unix systems. So far, Adobe has established another standard called PDF (Portable Document Format). (Back)
- It costs CPU, hard disk and memory to do software emulation. But modern CPU are faster than ever. Hard disk and memory prices are also very cheap now. Unless you are running a print server, or you are doing mass printing, you don’t really have to worry about this. If you ever need to do mass printing that might affect the system performance, you should afford a PostScript printer. :p (Back)
- Some of the Canon, HP and NEC printers and Sun raster file format use uniprint, too. Because uniprint is more flexable since it doesn’t need a recompilation of the Ghostscript itself, it has become the recommended driver format of the Ghostscript authors. (Back)
- Ghostscript was GNU before, that allows limited commercial use. After version 5.50, Ghostscript’s maintainance was transferred to artofcode LLC and Artifex Software Inc. They employ the Aladdin License that disallows the commercial use. This new version of Ghostscript is also called the Aladdin Ghostscript. Artofcode LLC and Artifex Software Inc have released version 6.52 as GNU recently. You can freely select which Ghostscript to use. New versions have less bugs, but we should support GNU packages. However, if you need to use it commercially, you can only select the GNU Ghostscript. For the same reason, most linux distributions, including Red Hat, only come with GNU Ghostscript. (Back)
- If you can find your Ghostscript driver at all, you might have to write one yourself, or you’ll have to give up now. :p Refer to the Ghostscript documentation for the Ghostscript driver specification. (Back)
- If it doesn’t, refer to the Ghostscript documentation. (Back)
- Most printers can print ASCII English text directly. The text does not need to convert to PostScript document with a2ps. However, if you need to use the Chinese fonts to print the Chinese text, or your printer cannot print the ASCII English text directly (which is mostly not possible ^^; ), you will need to convert the text into PostScript document with a2ps before printing. (Back)
- Besides, Ghostscript can read PDF directly. You could send PDF files to Ghostscript directly, just like the PostScript files. (Back)
- netpbm was formerly PBMPLUS. PBMPLUS was a set of graphic converters, which had stopped maintainance after Dec 10, 1991. At a later time a group of people put the PBMPLUS and several newly collected converters together and make the netpbm package. PBMPLUS and netpbm have established the PNM (Portable aNyMap) intermediate graphic format. People can convert all kinds of graphic files into PNM format, and then convert the PNM data into the target format. Thus, programmers only need to write 2n, instead of n2 converters. This greatly saves the programmers’ works. (Back)
- Alternatively, you can use all kinds of direct PostScript converters instead. For example, gif2ps in the libungif package, jpg2ps, imgtops2… etc. But I suggest you to use netpbm, for these converters have their individual problems. The size of a pixel is different for screens than for printers. If no proper adjustments were done, the output result may be too large or too small. gif2ps will adjust the image to the paper size, which may be very handy for large images, but is not a good workaround basically. jpeg2ps can configure the resolution, but it cannot read from /dev/stdin, hence cannot work with print filters. img2ps is merely a wrapper that wraps the jpeg image data with PostScript commands using the new jpeg support in PostScript version 2. It is not really a converter. The advantage of img2ps is that, it won’t uncompress jpeg image data, and thus is faster and the output result size is smaller. But the result resolution is not adjusted. You may get a very large print result at last. On the other hand, netpbm will adjust the resolution, which may be the best solution for now. (Back)
- lpdomatic (LPD-O-Matic) was designed to use with the old lpd. It is a widely-used print filter. It contains only a single perl script, thus is very small and simple. lpdomatic needs its own printer drivers. You can look for your driver and download it at the LinuxPrinting printer database. (Back)
- I did not find much about magicfilter. From the the infomation I found so far, it seems to be a print filter designed for Debian Linux. (Back)
- apsfilter is simple: you choose your printer from a list, and it will do the necessary changes to the configuration files. Many people like it, but not me. I don’t like automatic stuffs. It modifies /etc/printcap by itself; Its documentation is poor; you can only choose the drivers included with Ghostscript, while your downloaded drivers are not available. If you want to use apsfilter, you have to install LPRng first. It is very simple to install apsfilter: Unzip and untar your downloaded .tar.gz tarball into /usr/share/, then go into the apsfilter subdirectory and run ./SETUP. That’s all. (Back)
- rhs-printfilters is written by Red Hat Inc. to work with Red Hat Linux. It thus has many users, too. rhs-printfilters has only RPM installation. You have to configure it with printtool. Like the apsfilter, it will do the necessary changes to the configuration files for you. It runs only in X, choose printers from its internal printer list, and modified /etc/printcap by itself: So I hate it, too. :p If you want to use rhs-printfilters, you have to install LPRng first, then rhs-printfilters and printtool. Then, start your X and run printtool to choose your printer. (Back)
- Use the following line if you are using a2ps:
(Back)*text* filter \%s{a2ps_converter} - If no matching was found, no printing will be done and ifhp will exit with an error code. (Back)
- Use the following line if you are using imgtops2:
(Back)jpeg_converter= /usr/bin/imgtops2
- Use the following line if you are using gif2ps:
We need to exit 0 because gif2ps exits an error code even for non-critical warnings, which leads ifhp to believe that the conversion was failed and to stop printing. (Back)gif_converter= /usr/bin/gif2ps; exit 0
- If not, debug with the following steps: Write a simple shell script /tmp/send:
Run#! /bin/sh file=/tmp/myfile ifhp=model=xxxxxxxx cat /dev/null >/tmp/t cat $file | /usr/libexec/filters/ifhp -Tdev=/tmp/t,trace,debug=2,${ifhp} 2> /tmp/trace
Review /tmp/trace and see what went wrong. You can enlarge the debug= value (for ex., debug=10) for more detailed debugging infomation. (Back)$ sh -x /tmp/send
- Why is printing so complicated? Because printer is a external device, which connects to the host machine with cords and connectors. In order to communicate and do jobs for the host machine, it has to do
spooling
.Spooling
is means to line up in a queue. When jobs may not be run instantly for various reasons (for ex., speed difference, communication problem, disconnection, unstable connection or insufficient memory… etc.) they have to line up in a queue first to wait for their turns. When this happens, you need a queue manager to manage the queue, set its order, pause the queue, or even delete a job from the queue. Mail transference need spooling, too, because it sends messages across different hosts from distance. In fact, the communications between the components of your computer (CD-ROM, floppy, hard disk, memory… etc.) needs spooling, too. But you won’t feel them because they are silently dealed by the internal spooler system. (Back) - Because we can’t grant everyone the privilege to write into /dev/lp0 directly, we need to grant a special privilege to the LPRng. One way is to make lpd setuid-root, but it is relatively dangerous. The other way is run lpd in daemon mode: Start lpd in daemon mode by root. It then turns its user into lp and waits for printing requests from lpr. If you are running lpd in this mode, be sure that the user lp has the privilege to write to /dev/lp0. (Back)
- If you are using
automatic
filters, like apsfilter or rhs-printfilters, you can bypass this part and set up your filter now. (Back) - If not, try:
to check the printer logs. If this still doesn’t help, refer to the LPRng HOWTO for more infomation. (Back)% lpq -L
- The printing data from the windows samba clients are already converted into low-level printer language by the windows printer drivers. There’s no necessity (and you shouldn’t) to convert this data again. You should configure the raw data to be sent to the printer on /dev/lp0 directly in your print filter configuration. If you are setting your printer for your windows clients only, you can bypass the print filter entirely and send the printing data directly to the printer. This is described in the front of this document. (Back)
- If you cannot see your printer from the network neighborhood, refer to the samba printing documentation. (Back)
- If it won’t work, check the printing logs by running lpq -L. (Back)
References:
Refer to the following addresses for more infomation:
- Linux HOWTO: Printing-HOWTO, Printing-HOWTO Chinese translation by henryjen
- LinuxPrinting: http://www.linuxprinting.org/, LinuxPrinting printer database
- LPRng: http://www.lprng.com/, LPRng-HOWTO
- ifhp: http://www.lprng.com/, IFHP-HOWTO
- LPD-O-Matic (lodomatic): http://www.linuxprinting.org/lpd-doc.html
- apsfilter: http://www.apsfilter.org/
- magicfilter: http://www.gnu.org/directory/magicfilter.html
- rhs-printfilters: http://www.redhat.com/
- Ghostscript: GNU ghostscript http://www.cs.wisc.edu/~ghost/ or AFPL ghostscript http://www.ghostscript.com/, Ghostscript documentation, Ghostscript usage, Ghostscript printer documentation
- a2ps: http://www-inf.enst.fr/~demaille/a2ps/
- html2ps: http://www.tdb.uu.se/~jan/html2ps.html, html2ps documentation
- netpbm: http://netpbm.sourceforge.net/, or PBMPLUS http://www.acme.com/software/pbmplus/
- libungif: http://prtr-13.ucsc.edu/~badger/software/libungif/, libungif documentation
- imgtops2: http://www.cs.washington.edu/homes/dougz/postscript/imgtops2/
- jpeg2ps: http://www.pdflib.com/jpeg2ps/
- samba: http://www.samba.org/samba/samba.html, Chapter 10. Printing
- In addition: Why not
libgif
, butlibungif
? Read the following story: The GIF Controversy: A Software Developer’s Perspective


